☑︎ Diese Bewertung wurde zuletzt im May 2026 aktualisiert
Hostinger gehört heute zu den günstigsten bekannten Hosting-Anbietern. In den Werbeanzeigen heißt es: ☕ “Hostinger kostet weniger als ein Latte”…
…aber lassen wir Marketingversprechen und Gruppendenken beiseite:
Seit über 7 Jahren kaufen wir Tarife, migrieren Websites, testen Traffic und stellen dem Support mitten in der Nacht Fragen. Hier ist unser ungefiltertes Fazit.
Funktionen: Globale Reichweite und eigene Produkte:
Entdecken
9/10
10/10
Performance: Konstante Uptime und großzügige Ressourcen:
Daten prüfen
9/10
Support: Schneller Chat mit echten Menschen rund um die Uhr:
Details ansehen
8/10
(Wie wir sehen werden, ist Hostinger nicht für jeden geeignet; aber falls du dich dafür entscheidest, schau dir nach dem Fazit unbedingt den Bonus-Abschnitt an – dort zeigen wir einen Trick, mit dem du den absolut besten Preis bekommst)
Bereit herauszufinden, ob ein günstiger Hoster über sich hinauswachsen kann – oder ob du den niedrigen Preis an anderer Stelle bezahlst? Los geht’s:
Hostinger vs andere Hoster
Fun Fact: Hostinger startete 2004 als kostenloser Hosting-Service!
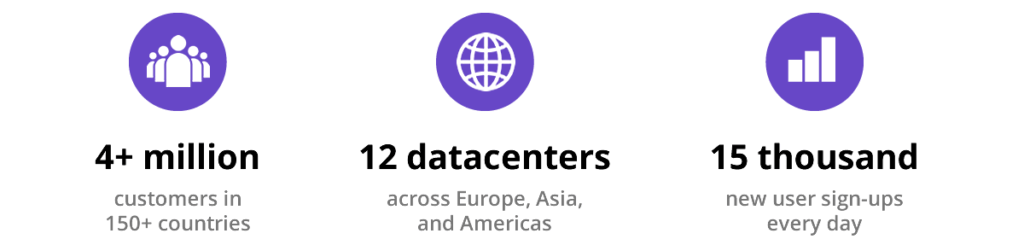
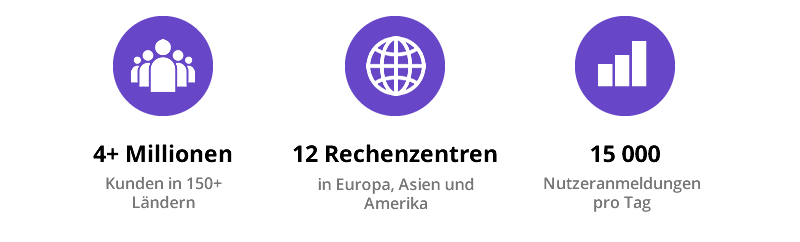
Aus diesen bescheidenen Anfängen ist Hostinger bis May 2026 zu einem der größten Hosting-Anbieter der Welt gewachsen:
Doch der Anbieter bleibt seinen Ursprüngen treu und verfolgt offenbar die Philosophie, schlank zu bleiben – und sich ständig weiterzuentwickeln. Woher wir das wissen?
- Beste Preise 🤑 Hostinger war schon immer so günstig, dass es fast kostenlos ist
- Alles inhouse 🛠️ von eigenen Rechenzentren bis hin zum eigenen Control Panel
- Schnellere Rollouts ⚡ immer vorne mit dabei, wenn es um KI geht
Hier sind die Hauptpunkte, die Hostinger aus der Masse ähnlich aussehender Hosting-Anbieter herausstechen lassen:
-
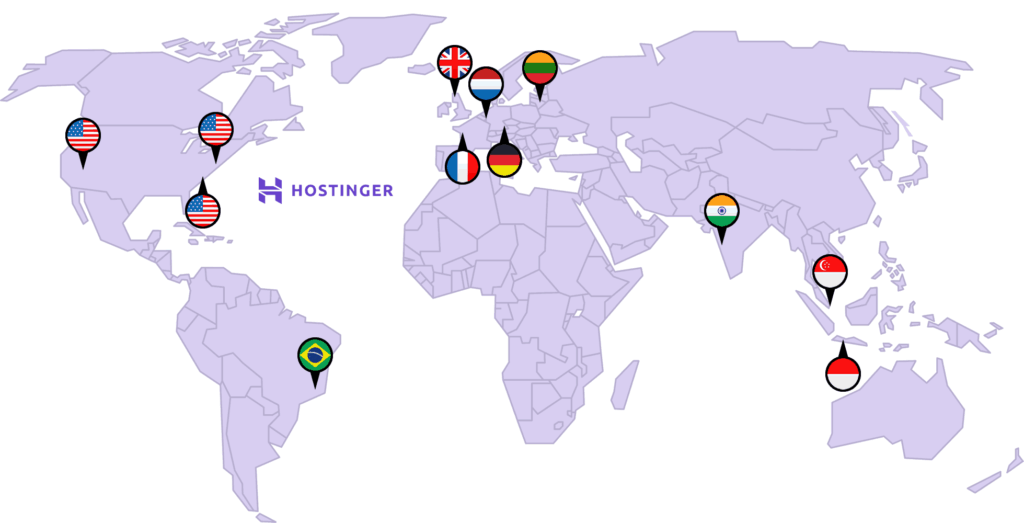
Wirklich globale Rechenzentren: du kannst aus 12 Regionen auf 4 Kontinenten wählen (USA, UK, NL, FR, LT, IND, BR, SG, HK, AU). Hostinger macht daraus kein großes Marketing, aber alle Rechenzentren werden entweder mit erneuerbarer Energie betrieben oder vollständig damit ausgeglichen ☘️
-
Eigenes Control Panel: seit 2011 bietet Hostinger sein eigenes hPanel an („h“ für „Hostinger“), das die Funktionen von cPanel beibehält, aber dessen 2005er-Optik und Komplexität hinter sich lässt.
-
Next-Gen KI-Builder:
neu in 2025 – mit dem kürzlich gestarteten Horizons kannst du jetzt eine WordPress-Seite – oder sogar einen kleinen SaaS-Prototypen – aus nur einem einzigen Prompt erstellen. Nicht ganz wie Lovable, aber deutlich nutzerfreundlicher. Mehr dazu findest du im Abschnitt frühe Einblicke weiter unten.
-
Bis zu 25 Websites hosten: während Wettbewerber ihre Starterpläne oft auf 1 Domain beschränken, erlaubt dir Hostinger im günstigsten
Premium-Plan, 25 (!) Websites zu hosten (mehr Details in unserer Tarif- und Preis-Analyse)
- Großzügige Serverressourcen: für den Preis, den du zahlst, bekommst du mehr Speicher, RAM und Inodes als bei anderen Budget-Hostern.
Um die letzten Punkte zu verdeutlichen, hier ein Vergleich des günstigsten Hostingplans (zum gleichen Preis) bei Hostinger und den zwei nächsten Konkurrenten:
Die RAM-Größe (Random Access Memory) bestimmt, wie stabil deine Website bei höherem Besucherverkehr bleibt, und Inode-Limits definieren im Grunde, wie viele einzelne Dateien du speichern kannst.
| Einsteigerplan |
Websites |
Speicher |
RAM |
Inodes |
| Hostinger Premium |
25 |
25 GB SSD |
1024 MB |
400 K |
| SiteGround StartUp |
1 |
10 GB SSD |
768 MB |
200 K |
| Ionos Essential |
1 |
10 GB SSD |
512 MB |
262 K |
Hostinger bietet in der Regel bessere Kernfunktionen zu konkurrenzfähigen Preisen – aber es gibt auch Dinge, auf die du nicht allzu viel geben solltest –
Was NICHT so besonders ist
Mal ehrlich: Manche Funktionen von Hostinger sehen beeindruckend aus, bis du merkst, dass sie in 2026 Branchenstandard sind:
- Kostenlose Mailboxen gibt es bei jedem großen Hoster.
- SSD-Speicher ist längst nichts Besonderes mehr.
- 30-Tage-Geld-zurück ist nett, aber nicht mehr selten.
- E-Mail-Marketing wird zunehmend zum Standard-Add-on.
- Kostenlose Migration ist super, macht aber inzwischen jeder.
- 99,9 % Uptime-Garantie ist das, was du erwarten solltest in 2026.
Nicht falsch verstehen – diese Dinge sind nicht schlecht, nur eben keine Alleinstellungsmerkmale. Du wählst Hostinger nicht wegen dieser Punkte 🤷
Fazit:
Hostingers Vorteil ist eine Mischung aus Größe (mehr Rechenzentren, mehr Sites, mehr Ressourcen) und Schnelligkeit beim Start (hPanel, Horizons). Alles andere? Ungefähr auf Augenhöhe mit anderen modernen Budget-Hostern – zu besseren Preisen.
Apropos Preise:
Den richtigen Hostinger-Tarif wählen
Hostinger mag günstig sein, aber das Angebot ist definitiv kein abgespecktes Basisprogramm. Tatsächlich gibt es drei eigenständige Produktlinien – jede für einen anderen Nutzertyp konzipiert:
Shared Hosting 🚀 – preiswert und einsteigerfreundlich, gedacht für persönliche Websites und kleine/mittlere UnternehmensseitenVPS Hosting ⚙️ – individuell konfigurierbare virtuelle Server für Entwickler oder spezielle Anwendungsfälle wie GameserverHorizons 🤖 – ein neues, promptbasiertes KI-Tool für schnelles Prototyping von Webanwendungen
…Moment, was ist mit den anderen Angeboten auf der Website?! Nun, diese basieren auf den Shared-Hosting-Tarifen und sind für bestimmte Anwendungsfälle aufbereitet:
- Managed WordPress und WooCommerce sind in 2026 praktisch dasselbe wie das Shared Hosting-Angebot. Früher war das ein separates Produkt, aber inzwischen sind alle Shared-Pläne mit denselben Funktionen ausgestattet.
- Cloud Hosting ist im Grunde der
Cloud Startup Shared-Plan, mit der Möglichkeit, die Serverressourcen noch weiter zu skalieren (d. h. keine neuen Features oder Add-ons) – ideal für Websites mit hohem Traffic.
Hier eine kurze Übersicht:
Preise für die günstigste Option (längster Abrechnungszeitraum); kürzere Laufzeiten und monatliche Abrechnung sind verfügbar, kosten aber mehr.
| Produkt |
Am besten geeignet für |
Ab |
Enthalten |
| Shared Hosting |
Erstmalige Website-Besitzer, Blogger, kleine E-Commerce-Seiten |
€2.99 /Monat (48 Mon.) |
Bis zu 25 Websites, LiteSpeed-Server, 1-Klick-WP, kostenlose Domain und E-Mail |
| VPS Hosting |
Entwickler, Gamer oder alle, die Root-Zugriff benötigen |
€4.99 /Monat (24 Mon.) |
Dedicierte Ressourcen, voller SSH-Zugriff, Gameserver-ISO-Vorlagen |
| Horizons KI-Builder |
Entwickler und Nicht-Coder, die schnell ein SaaS testen wollen |
€13.99 /Monat (12 Mon.) |
Prompt-zu-Website-Chat, integriertes Hosting (1 Jahr kostenlos) |
Schauen wir uns diese Produkte im Detail an, damit du nicht zu viel zahlst – oder schlimmer noch, am Ende das Falsche kaufst:
Shared Hosting: Das Sweet Spot für die meisten Nutzer
Wenn jemand „Webhosting“ sagt, meint er meist „Shared Hosting“: Deine Website teilt sich die Rechenressourcen (CPU, RAM usw.) mit mehreren anderen Websites auf demselben physischen Server.
Das ist wie ein Zimmer in einem großen Haus zu mieten – du nutzt gemeinsames Wasser, Heizung, Küche usw.: günstig, praktisch und leicht zu verwalten.
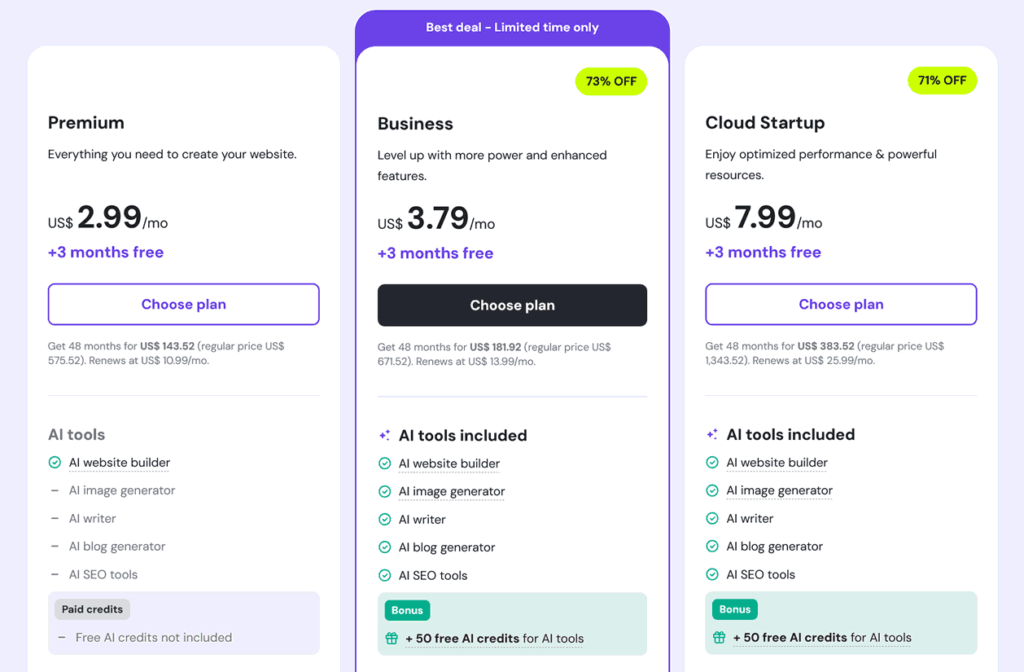
Wenig überraschend ist dies Hostingers beliebtestes Produkt – und das, das wir 90 % der Leser empfehlen würden. Es gibt drei Stufen:
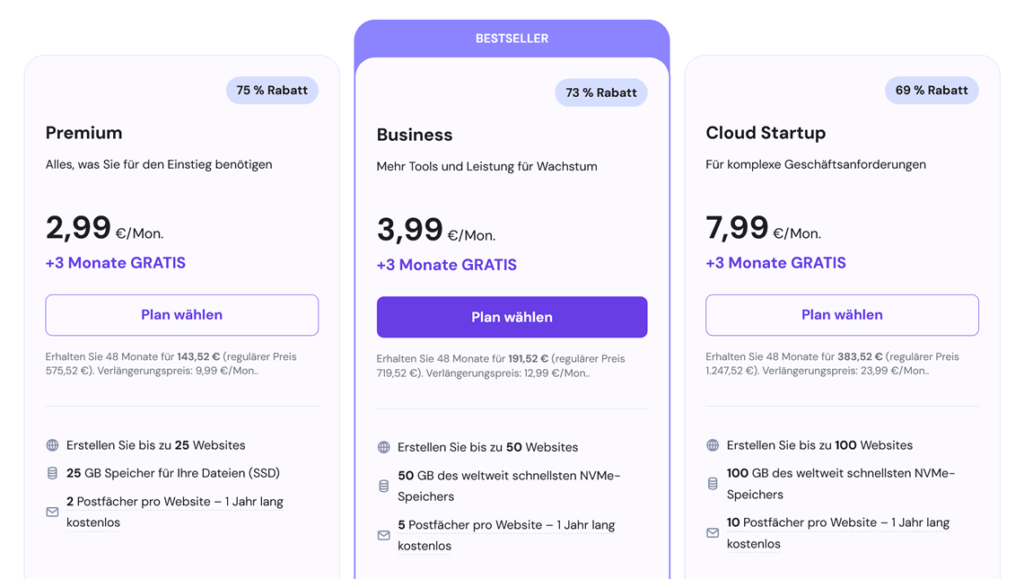
Da du jederzeit upgraden kannst, ist Premium ein guter Startpunkt, wenn du einen Blog oder ein persönliches Projekt starten möchtest.
Kleine und mittlere Unternehmen werden die zusätzlichen Vorteile des Business-Plans von Anfang an zu schätzen wissen – besonders die KI-Tools, die viele manuelle Aufgaben automatisieren, tägliche Backups und schnellen NVMe-Speicher für bestmögliche Ladezeiten.
Hier eine Übersicht, die dir die Entscheidung erleichtert:
| Plan |
Typischer Nutzer |
Ressourcen |
Backups |
Preis (48 Mon.) |
Premium |
„Starte-meinen-ersten-Blog“-Einsteiger |
1 GB RAM, 25 GB SSD |
Wöchentlich |
2,99 €/Mon. (9,99 € Verlängerung) |
Business |
Wachsende Shops & Freelancer |
1,5 GB RAM, 50 GB NVMe |
Täglich |
3,99 €/Mon. (12,99 € Verlängerung) |
Cloud Startup |
Agenturen, Websites mit hohem Traffic |
3 GB RAM, 100 GB NVMe |
Täglich + bei Bedarf |
7,99 €/Mon. (23,99 € Verlängerung) |
WICHTIG: Bevor du dir das 2,99 €/Monat-Angebot sicherst, gibt es ein paar Dinge zu beachten –
- Achte auf den Abrechnungszeitraum 🗓️ – der niedrigste Preis gilt nur, wenn du 48 Monate im Voraus bezahlst; kürzere Laufzeiten = höherer Monatspreis
- Preise steigen bei Verlängerung 🔁 – nach der ersten Laufzeit (z. B. 48 Monate) gelten die regulären Preise, die um ein Mehrfaches höher liegen. Prüfe diese vor dem Kauf und setze dir eine Erinnerung, um rechtzeitig zu entscheiden (Verlängerung erfolgt meist automatisch).
- Umsatzsteuer nicht enthalten 💸 – die Preise auf der Angebotsseite sind Nettopreise; die MwSt. wird je nach Land beim Checkout hinzugefügt.
Es ist also nicht „2,99 €/Monat für immer“ – aber das gilt im Grunde für jeden Hosting-Anbieter.
Und vergiss nicht den zusätzlichen Rabatt auf den Angebotspreis, den du mit dem Gutscheincode aus unserem BONUS-Abschnitt bekommst – der reduziert den Preis oft um weitere 10–15 %.
VPS Hosting: Für Entwickler und spezielle Projekte
VPS = Virtual Private Server; du bekommst dedizierte Ressourcen, egal wer sonst noch auf derselben physischen Maschine läuft.
Um bei unserem Wohnungs-Vergleich zu bleiben:
Das ist wie eine eigene Wohnung – der Vermieter besitzt zwar immer noch das Gebäude, aber deine Einheit hat garantierte Quadratmeter und einen eigenen Sicherungskasten.
Mit anderen Worten: Wenn du vollen Root-Zugriff willst, nicht-WordPress-Projekte betreiben oder einen Gameserver hosten möchtest – hier ist dein Spielplatz 🪛
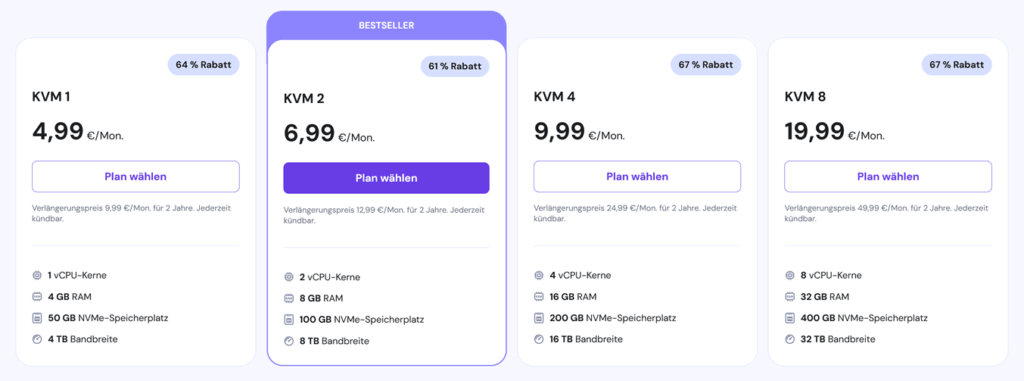
Die VPS-Tarife von Hostinger (genannt KVMs oder Kernel-based Virtual Machines) starten bei 4,99 €/Monat und steigen je nach CPU, RAM, Speicher und Bandbreite:
Wie schlägt sich das im Vergleich zu spezialisierten Plattformen wie Digital Ocean?
Hier ein schneller Vergleich von Hostingers KVM1 (der günstigste VPS-Tarif) mit einem vergleichbaren Digital Ocean Basic Droplet:
| Anbieter |
RAM |
vCPU |
Speicher |
Preis/Monat |
| Hostinger VPS |
4 GB |
1 vCPU |
50 GB |
4,99 € (9,99 € nach 2 Jahren) |
| Digital Ocean |
4 GB |
2 vCPUs |
80 GB |
20,00 € (Festpreis) |
Mit anderen Worten:
-
Du bekommst ähnliche oder sogar bessere Server für die Hälfte des Preises – selbst nach Ablauf des Angebotszeitraums. Keine schlechte Idee für einen Projekttest!
-
Du kannst außerdem Kodee nutzen, Hostingers integrierten KI-Assistenten, um deinen VPS über eine ChatGPT-ähnliche Oberfläche zu verwalten und Probleme zu beheben – ja, ich weiß, nicht so cool wie stundenlang an der Kommandozeile zu tüfteln und auf StackExchange zu stöbern – aber definitiv ein Zeitgewinn.
-
Und: Hostingers 30-Tage-Geld-zurück-Garantie gilt auch für VPS-Tarife – ein echter Pluspunkt, wenn man bedenkt, dass Digital Ocean und Co. überhaupt keine Rückerstattungen anbieten.
Fazit?
Hostingers VPS ist nicht die leistungsstärkste oder vielseitigste Plattform da draußen – aber wenn du etwas Individuelles baust und die volle Kontrolle brauchst, bleibt Hostingers VPS eine solide, budgetfreundliche Option.
Horizons: Der Next-Generation KI-Website-Builder
Ziemlich viele Hosting-Anbieter haben in 2026 irgendeine Art von KI-gestütztem Website-Builder – aber Hostinger geht einen Schritt weiter:
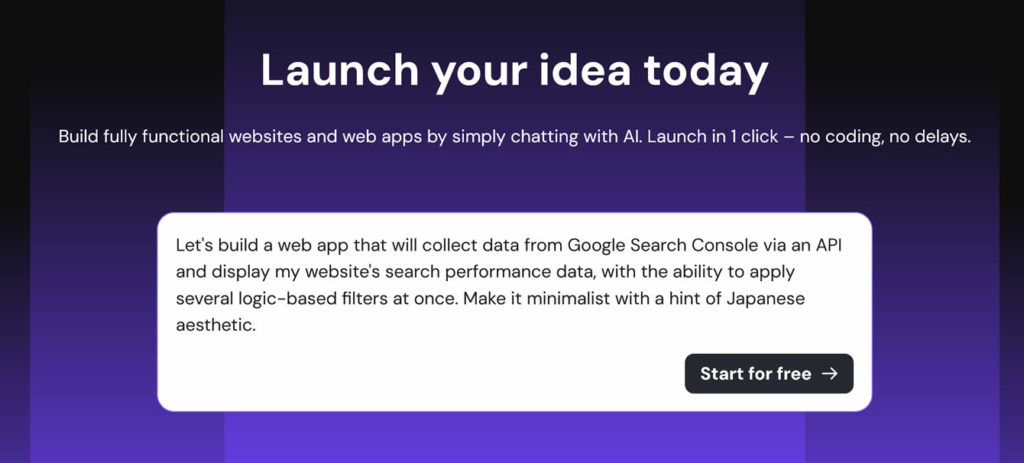
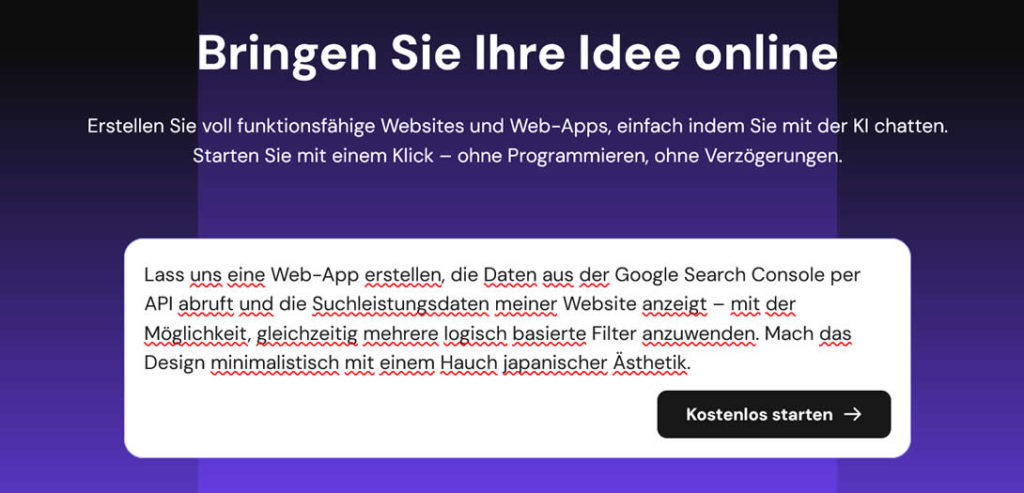
Hostinger Horizons ist ein neues Produkt, mit dem du komplette Websites und Web-Apps auf Basis eines einzigen Prompts erstellen kannst – quasi ChatGPT für Webhosting:
- Beschreibe deine Idee: Sag der KI, was du bauen möchtest – sei es eine Website, ein Aufgaben-Manager, ein Fitness-Tracker oder eine andere Web-App.
- Anpassen und verfeinern: Du kannst live mit der KI chatten, um Texte, Design oder Funktionen zu optimieren.
- Sofort starten: Veröffentliche deine App mit nur einem Klick – inklusive Hosting und eigener Domain von Hostinger.
Wir testen Horizons seit der Beta-Phase; hier ein Beispiel-Prompt, den wir verwendet haben:
Einige Dinge, die uns bisher gefallen haben:
-
Versionierung: Du kannst dein Projekt mit einem Klick auf jede vorherige Version (d. h. Prompt) zurücksetzen.
-
Mobilfreundlich: Alles ist automatisch für kleine Bildschirme optimiert, und du kannst jederzeit zwischen den Ansichten wechseln.
-
Erstellung aus Bild: Du kannst ein visuelles Mockup hochladen, und Horizons baut daraus eine funktionierende App.
-
Integrationen: Du kannst deinen Prototyp mit Stripe, Supabase oder nahezu jeder anderen Drittanbieter-API verbinden.
Einige fortgeschrittene Funktionen, die es in Horizons derzeit noch nicht gibt:
-
GitHub-Synchronisierung: Wenn es ein Muss ist, deinen Code automatisch in ein Git-Repo zu pushen, probiere stattdessen Lovable.
-
Direkte Codebearbeitung: Bisher kannst du den Code nur über den Chat ändern, nicht durch direktes Tippen.
Und hier ist übrigens das Ergebnis unseres Prompts aus dem vorherigen Bild:
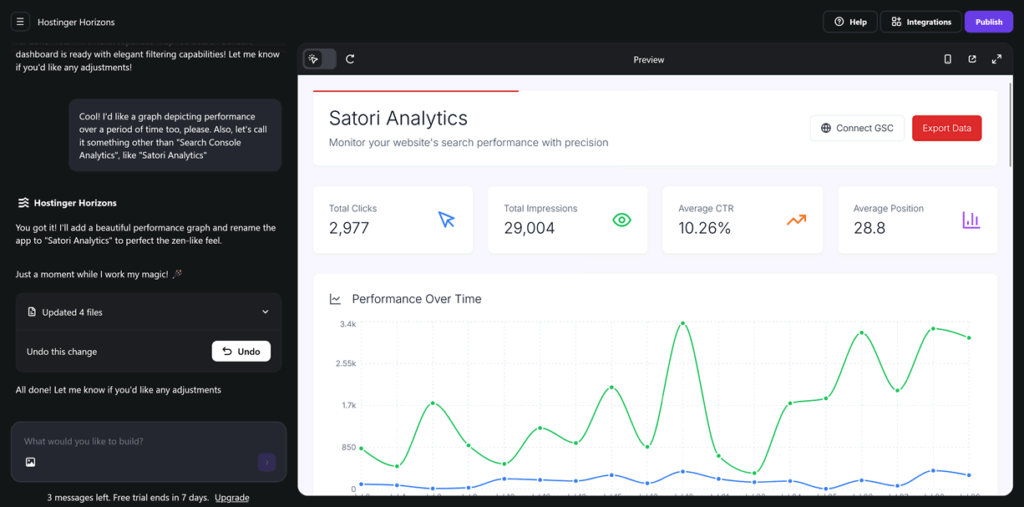
Klar, es gibt viele neue Startups, die Website- oder App-Erstellung aus Text-Prompts anbieten…
aber keines davon hat die Infrastruktur, den Support und (vor allem) die 20-jährige Erfolgsbilanz von Hostinger.
Mit anderen Worten – wenn du auf „Vibe Coding“ stehst, ist Horizons definitiv einen Versuch wert.
…und aktuell kannst du es 7 Tage lang kostenlos testen mit 5 Prompts.
💡 Tipp: Scrolle ganz nach unten auf der Seite, falls du den Button für die 7-Tage-Testversion nicht siehst.
– danach kannst du zwischen 3 Plänen wählen, je nachdem, wie viele monatliche Prompts du brauchst – von 70 im Starter bis zu 400 im Hustler:
| Plan |
Prompts |
Am besten geeignet für |
Preis |
| Starter |
70/Mon. |
Optimal zum Einstieg für Lernende, Anfänger und Enthusiasten |
13,99 €/Mon. (19,99 € regulär; Verlängerung: 13,99 €) |
| Hobbyist |
200/Mon. |
Ideal für Freiberufler und Kreative, um Ideen in einen Nebenerwerb zu verwandeln |
39,99 €/Mon. (55,99 € regulär; Verlängerung: 39,99 €) |
| Hustler |
400/Mon. |
Für Startups, Teams und Innovatoren, die mehr Flexibilität suchen |
79,99 €/Mon. (99,99 € regulär; Verlängerung: 79,99 €) |
Wie bei jedem KI-Produkt kann die tatsächliche Ausgabequalität variieren – und ja, das hängt auch stark von deinen Prompts ab :)
Aber die Bequemlichkeit und Geschwindigkeit sind schwer zu ignorieren –
Du kannst jetzt in unter einer Stunde einen Prototyp für eine Web-App starten, ohne Entwickler einzustellen oder eine einzige Zeile Code zu schreiben ⚡
Hostinger Horizons kostenlos testen ›
Dieses Produkt wird sich mit Sicherheit weiterentwickeln, je besser die zugrunde liegende Technologie wird – also erwarte bald weitere Updates von uns.
Wie wählst du aus?
Insgesamt hat jede Hostinger-Produktlinie ihre Stärken in ihrer jeweiligen Nische – ob Shared Hosting, VPS oder No-Code.
Zur Erinnerung hier ein einfacher Entscheidungsbaum, um zwischen ihnen zu wählen:
Brauchst du Root-Zugriff auf den Server?
├── JA: Du brauchst einen VPS
└── NEIN: Brauchst du schnell einen App-Prototyp?
     ├── JA: probiere Horizons aus
     └── NEIN: nimm die Shared-Pläne
Im nächsten Kapitel schauen wir uns Hostingers Infrastruktur in der Praxis an – mit Fokus auf Zuverlässigkeit und Geschwindigkeit:
Günstiges Hosting ist super – bis deine Website langsam lädt oder einfach mal offline geht! Deshalb haben wir in den letzten 7 Jahren regelmäßig Performance-Checks der Hostinger-Infrastruktur durchgeführt, mit Fokus auf die zwei Dinge, die am meisten zählen:
🟩 Uptime: Wie oft ist deine Seite tatsächlich online?
⏩ Geschwindigkeit: Wie schnell reagiert der Server auf Besucher?
Hier sind die neuesten Ergebnisse, basierend auf über 300 Uptime- und Speed-Tests in den sechs Monaten bis zum aktuellen Monat (May 2026).
Uptime: Ist Hostinger zuverlässig?
Bevor wir mit Zahlen und Diagrammen um uns werfen, hier unser Test-Setup für die Hostinger-Uptime-Messung:
-
Wir haben 3 WordPress-Websites auf dem günstigsten
Premium-Plan genutzt, jede in einem anderen Rechenzentrums-Standort gehostet (Nordamerika – 🇺🇸 New York, Europa – 🇩🇪 Frankfurt, Asien – 🇸🇬 Singapur).
-
Für das Monitoring haben wir UptimeRobot mit 30-Sekunden-Intervallen eingesetzt, um selbst die kürzesten Ausfälle zu erfassen.
-
Zusätzlich haben wir Quervergleiche mit Hostingers eigenem öffentlichen Uptime-Report auf der Status-Seite durchgeführt.
Was ist dabei unser Minimal-Standard?
Hostinger gibt in Klausel 7 der Hosting-Vereinbarung eine 99,9 %-Uptime-Garantie – aber was bedeutet das konkret?
Hostinger verspricht, dass deine Website höchstens ca. 43 Minuten pro Monat offline ist – geplante Wartung und von dir verursachte Ausfälle nicht mitgerechnet.
Hier ein Screenshot eines unserer internen Uptime-Monitore bei UptimeRobot:
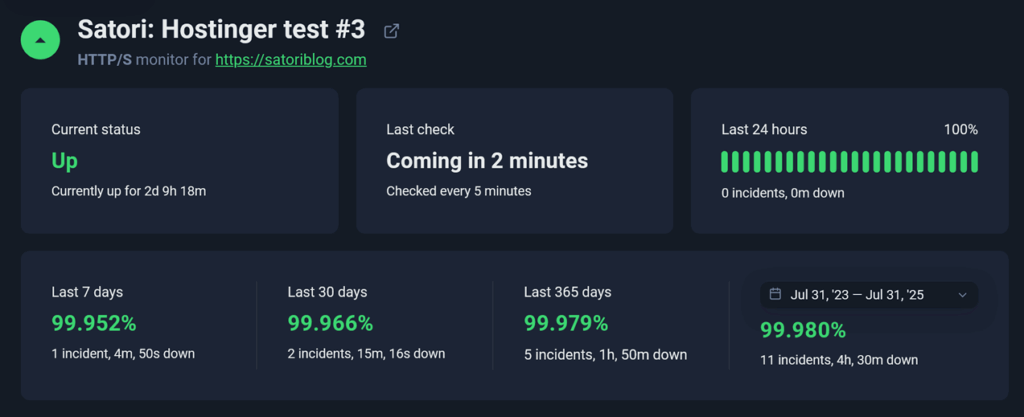
Unsere Testseiten schnitten in allen 3 Rechenzentren sehr ähnlich ab (die USA etwas besser als Europa und Asien):
In der jüngsten Testreihe zeigten Hostingers Server eine durchschnittliche 12-Monats-Uptime von 99,98 % über alle Test-Websites hinweg.
Das deckt sich weitgehend mit Hostingers eigenen Angaben: Die Uptime der „Core Services“ lag im letzten Jahr meist bei 100 % – nur in 2 von 12 Monaten lag sie bei 99,99 %.

Der letzte bekannte Ausfall unter 100 % war im März 2025
Andere Dienste liefen ähnlich stabil – der Website Builder hatte nur in einem Monat im letzten Jahr weniger als 100 % Uptime.
Horizons (Chat/Editor) fiel etwas auf, mit ein paar Monaten um 99,5 % seit dem Launch im März 2025. Wir sind gespannt, ob sich das stabilisiert, wenn das Produkt reift.
Fazit:
Hostingers Servicevereinbarung verspricht 99,9 % Uptime (~43 Min. max. Ausfall/Monat). Sowohl unsere eigenen Messungen als auch Hostingers Berichte übertreffen diesen Wert deutlich.
Geschwindigkeit: Wie schnell ist Hostinger?
Geschwindigkeit ist bei jedem Hosting-Anbieter schwieriger zu messen als Uptime – sie hängt von vielen Faktoren ab, die nichts mit den Servern selbst zu tun haben:
- Größe deiner Website 🖼️ (Bilder, Skripte, Videos usw.) sowie Theme und Plugins
- Entfernung 🌐 vom Server zum Besucher (auch Strom braucht Zeit, um durch Kabel und Luft zu reisen!)
- Caching, CDN und andere Optimierungen 📈, die Ladezeiten unabhängig von den obigen Faktoren verkürzen können
Um vergleichbare Daten zu bekommen, haben wir uns auf die Server Response Time konzentriert – also wie lange Hostinger braucht, um auf die erste Verbindungsanfrage zu reagieren. Unser Setup:
-
Für die Speed-Tests haben wir 9 frisch installierte WordPress-Seiten (gleiches Theme, keine zusätzlichen Plugins) auf
Premium-, Business– und Cloud Startup-Plänen (Shared Hosting) in 3 Rechenzentrums-Regionen (USA – 🇺🇸 New York, Europa – 🇩🇪 Frankfurt, Asien – 🇸🇬 Singapur) genutzt.
-
Gemessen wurde mit WebPageTest und GTMetrix via API. Jeder Test erfolgte von 3 Standorten (Los Angeles/San Francisco, London, Tokio) über 5/1 Mbps Breitband, jeweils 5× wiederholt und gemittelt.
-
Die Tests wurden zu zufälligen Tageszeiten und an allen Wochentagen durchgeführt, um Zeit-bedingte Ausreißer zu minimieren.
So sah ein typischer Test bei GTMetrix aus (über die Weboberfläche):
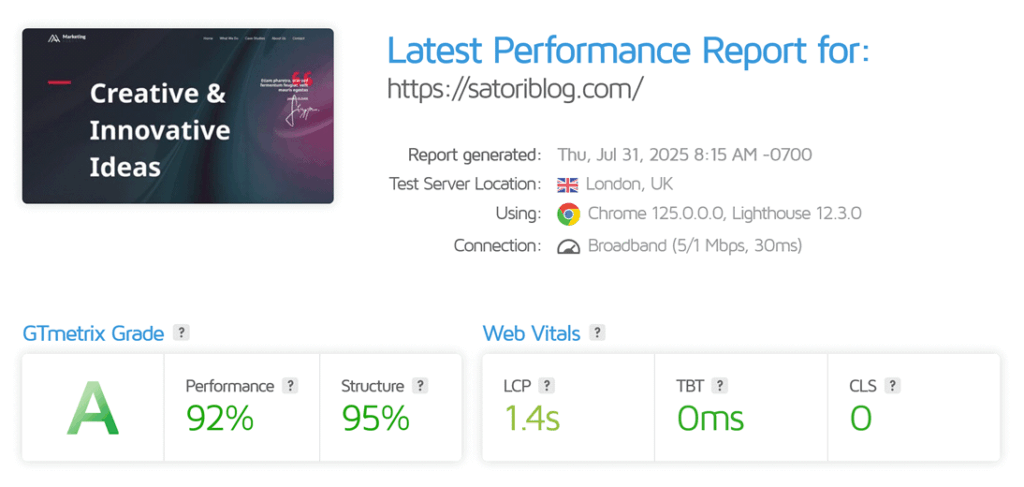
Insgesamt haben wir über 200 Tests wie diesen in 10 Wochen durchgeführt. Hier die Zusammenfassung:
* Time to First Byte (TTFB) misst, wie lange es dauert, bis irgendetwas vom Server kommt. Response Time = gesamte Antwortzeit inkl. Datenübertragung.
** Mittelwert der 5 größten Hosting-Anbieter basierend auf unseren eigenen und Hrank-Daten.
| Hostinger-Plan |
Response Time |
Time to First Byte * |
Vollständig geladen |
Premium |
680 ms |
320 ms |
1,9 s |
Business |
520 ms |
280 ms |
1,8 s |
Cloud Startup |
490 ms |
250 ms |
1,5 s |
| Hosting-Branche ** |
900 ms |
310 ms |
2,1 s |
Was heißt das?
Alles unter 800 ms ist für Shared Hosting gut; Hostingers obere Tarifstufen liegen unter einer halben Sekunde – der größte Sprung kommt wohl vom schnelleren NVMe-Speicher in den Business– und Cloud-Plänen.
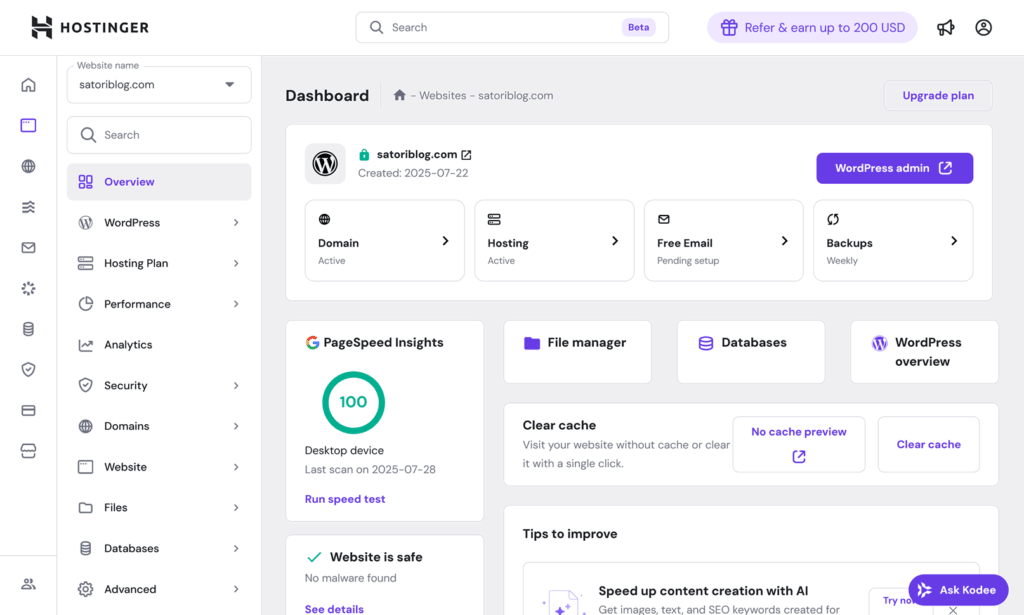
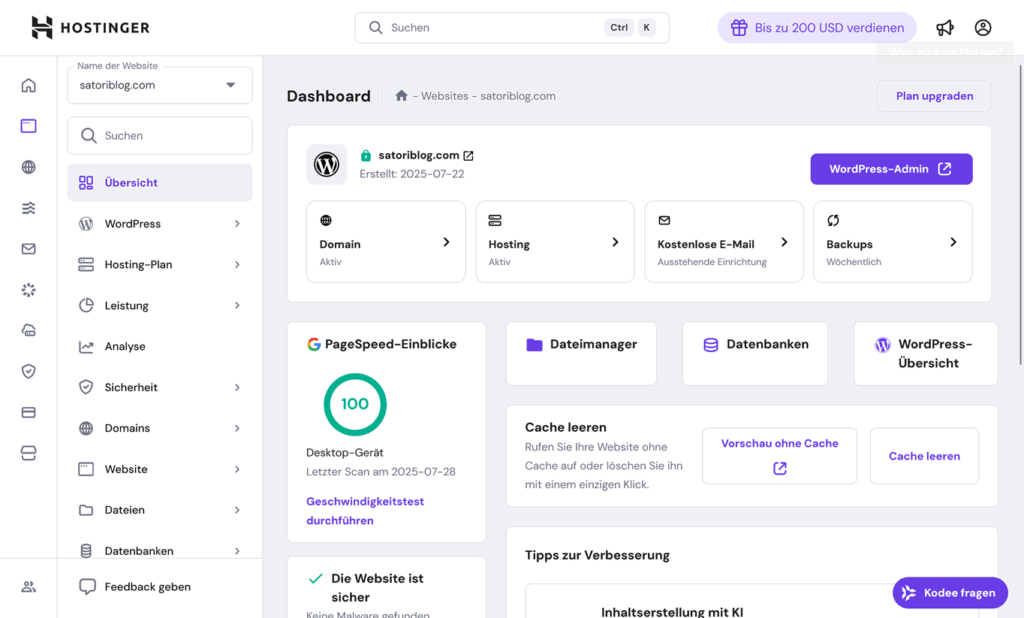
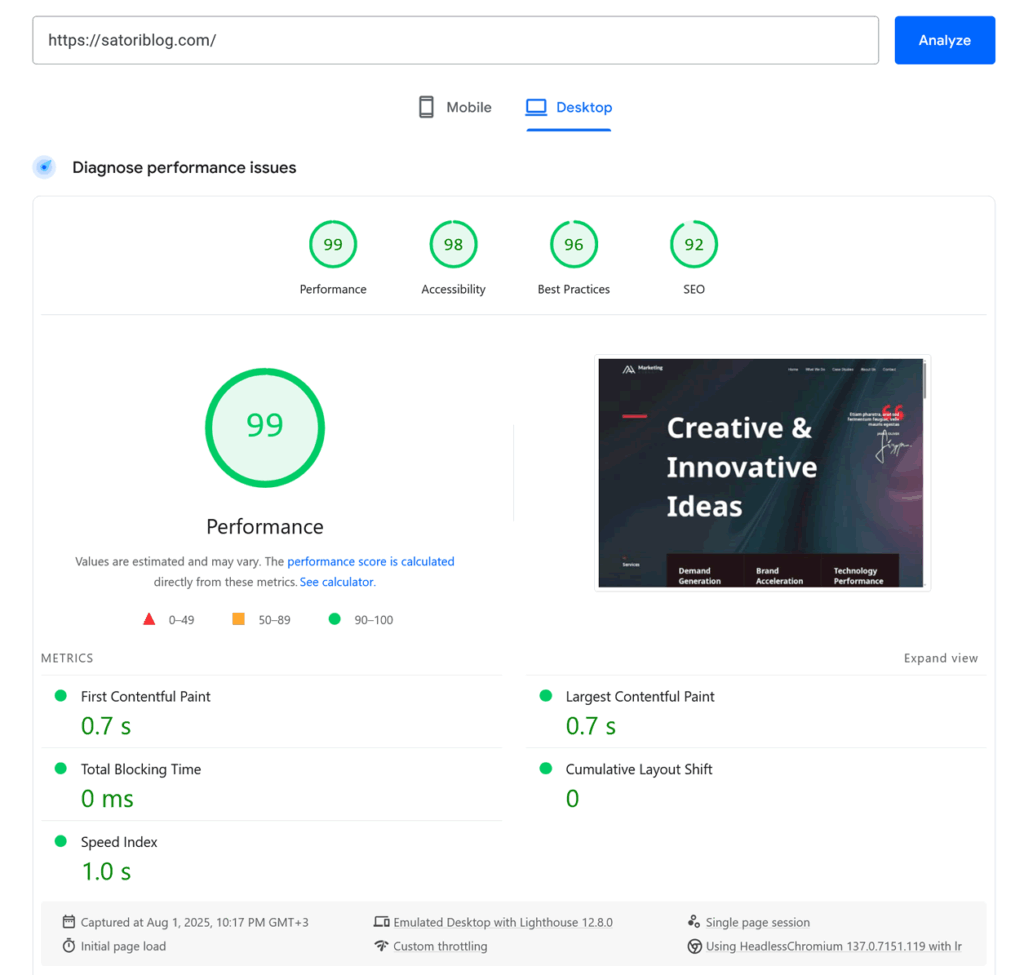
Wir haben außerdem Google PageSpeed Insights auf allen Testseiten laufen lassen – mit fast 100/100 Punkten bei der Performance:
Warum könnte deine Website trotzdem langsamer sein?
Servergeschwindigkeit ist nur ein Teil des Ganzen. Schwere Themes, 5-MB-Hero-Bilder und 27 WordPress-Plugins bremsen selbst das beste Hosting aus.
Hier eine einfache Speed-Checkliste, mit der du an einem Nachmittag 30–60 % Ladezeit einsparen kannst:
- LiteSpeed Cache aktivieren, um statische Versionen deiner WordPress-Seiten auszuliefern. In hPanel: Website → WordPress → Übersicht.
- Bilder optimieren bzw. in
.webp konvertieren – Ziel <100 kB (optimal ca. 50 kB) pro Bild.
- CDN verwenden (Content Delivery Network), um Besucher weltweit ohne zusätzliche Signalverzögerung zu erreichen – in hPanel: Website → Performance → CDN.
- Die Anzahl der Plugins möglichst gering halten und ungenutzte deaktivieren.
Fazit?
Für Shared Hosting unter 3 €/Monat ist selbst der günstigste Hostinger-Plan mehr als schnell genug – besonders, wenn du ein paar Minuten in einfache Optimierungen investierst.
Hostinger Kundenservice
Zuverlässigkeit und Geschwindigkeit sind wichtig – aber wenn deine Website ausfällt, Backups nicht funktionieren oder einfach etwas nicht stimmt, dann wird Support alles.
Der Hostinger-Kundensupport ruht auf drei Säulen:
💬 24/7 Live-Chat im hPanel (keine E-Mail oder Telefon).
🤖 KI-Assistent Kodee für sofortige Antworten auf einfache Fragen.
🧠 Wissensdatenbank mit Hunderten von Anleitungen.
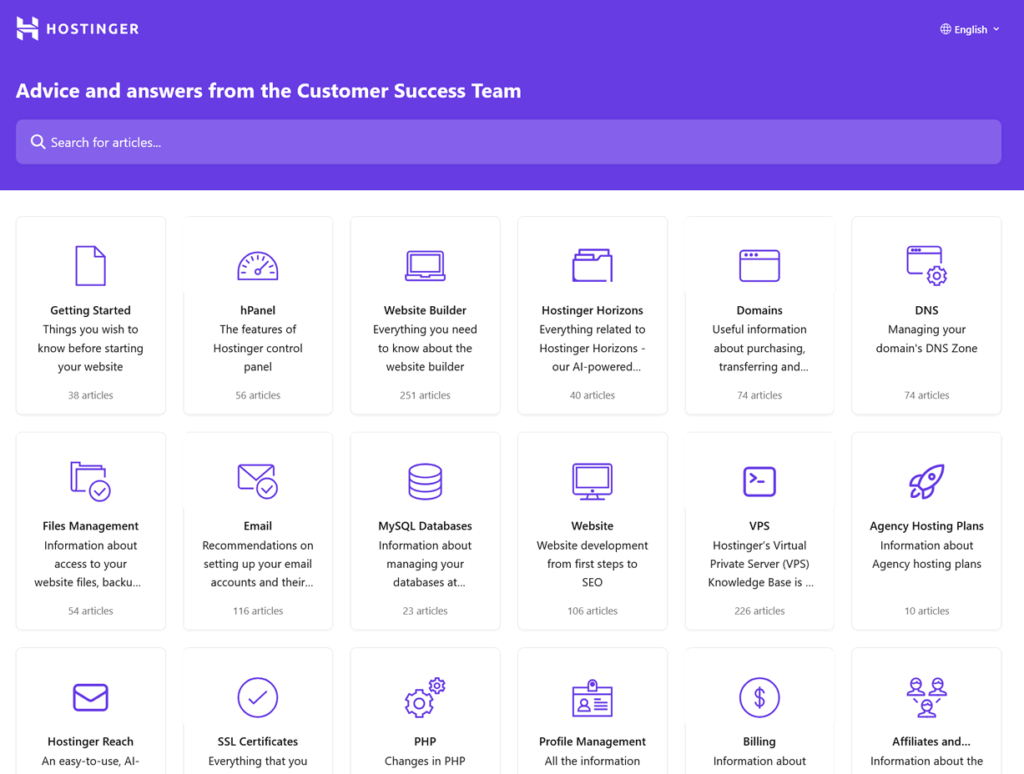
Bevor du den Chat startest, wirst du oft gebeten, die Selbsthilfe-Artikel zu prüfen; wir haben Dutzende davon durchgesehen – und es ist ehrlich gesagt eine der besseren Wissensdatenbanken da draußen:
- 1500+ Tutorials und Schritt-für-Schritt-Anleitungen, inklusive 500+ Videos
- 1200+ Support-Artikel, die jede erdenkliche Frage aus dem Support-Alltag beantworten
- Die meisten Artikel sind in über 10 Sprachen verfügbar – eine extreme Seltenheit bei Webhostern
- Deckt praktisch jedes Hostinger-Produkt und jede Nutzungssituation ab, durchsuchbar und regelmäßig aktualisiert (neueste Tutorials sind gerade mal 3 Tage alt)
Bei 95 % der Probleme wird dir das Help Center entweder direkt helfen oder dich darauf vorbereiten, im Chat gezieltere Fragen zu stellen.
Live-Chat
Apropos – schauen wir uns den Live-Chat genauer an:
- Melde dich in deinem Hostinger-Konto an und klicke auf den lilafarbenen Chat-Button („Ask Kodee“) unten rechts.
- Gib deine Frage ein und wähle die Option „Contact us“ – oder tippe einfach „talk to a human“.
- Du wirst mit einem Hostinger-Support-Mitarbeiter verbunden – normalerweise in unter 2 Minuten.
Falls du kein Hostinger-Kunde bist, kannst du über dieses Formular einen Termin mit dem Vertrieb vereinbaren.
Wir stresstesten das Hostinger-Supportteam regelmäßig – mit technischen und nicht-technischen Anliegen, sinnvollen und kuriosen Fragen, und zu zufälligen Nachtzeiten. Hier ein paar Zahlen der letzten 6 Monate:
* Gemessen von Chatstart bis „Problem gelöst“ oder Weiterleitung an das Technikteam
| Metrik |
Durchschnitt |
Bestwert |
Schlechtester Wert |
| Antwortzeit (erste Reaktion) |
1 Min 47 Sek |
21 Sek |
4 Min 02 Sek |
| Lösungszeit* |
11 Min 26 Sek |
3 Min 15 Sek |
28 Min 40 Sek |
Pluspunkt: Sie fügen manchmal Diagramme oder Screenshots ein – und hin und wieder auch ein Emoji 🐱
Um es nochmal klar zu sagen: Hostinger setzt auf Live-Chat als primären Supportkanal; das heißt –
🚫 Kein Telefon-Support
🚫 Kein E-Mail-basiertes Ticketsystem
🚫 Keine Bildschirmfreigabe oder Remote-Access-Optionen
Unterm Strich ist Hostingers Support bodenständig und auf Effizienz ausgerichtet –
Wenn du lieber telefonierst oder White-Glove-Service erwartest, solltest du vielleicht einen teureren Hoster wählen – wenn dir Support im Slack-Stil reicht, bist du hier gut aufgehoben.
Was, wenn du es dir doch anders überlegt hast?
Kündigung und Rückerstattung
Hostinger bietet auf die meisten Services – inklusive Shared Hosting, VPS und Horizons – eine unkomplizierte 30-Tage-Geld-zurück-Garantie.
Es gibt jedoch ein paar Ausnahmen:
- Neue Domains 🕒 können nur innerhalb von 96 Stunden nach Registrierung erstattet werden (und nicht alle TLDs sind erstattungsfähig – siehe Rückerstattungsrichtlinie)
- Domain-Privacy 🔒, SEO-Tools und bestimmte Drittanbieter-Services sind nicht erstattbar
- Alle Krypto-Zahlungen ₿ sind endgültig (Standardpraxis in der Hosting-Branche)
Wenn du bestehende Produkte kündigen willst, gehe zu Abrechnung → Abonnements, klicke auf den Pfeil für weitere Details und wähle „Automatische Verlängerung deaktivieren“.
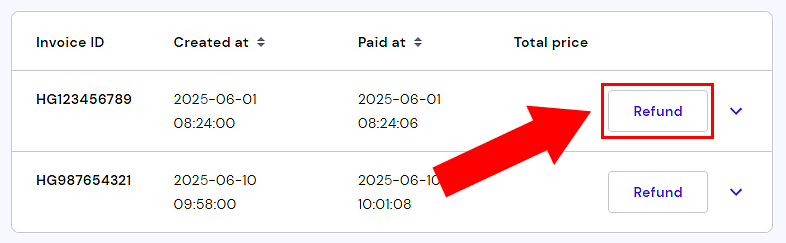
Falls du auch eine Rückerstattung möchtest, gehe zu Abrechnung → Zahlungsverlauf – dort findest du „Rückerstattung“-Buttons neben erstattungsfähigen Produkten. Bei uns dauerte es im Schnitt 2–3 Werktage:
⚠️ Willst du wirklich alles löschen (DSGVO-Style)? Klicke auf das Profil-Icon oben rechts im hPanel und gehe zu Kontoinformationen → Konto löschen.
Fazit:
Für diese Preisklasse sind Hostingers Wissensdatenbank und Chat-Support überdurchschnittlich gut. Solange du keinen Telefon-Support erwartest – und keine Wunder bei tiefen Servereingriffen – wirst du positiv überrascht sein.
Bevor wir klären, ob Hostinger auch in 2026 noch lohnt, schauen wir uns die Vor- und Nachteile an:
Vor- und Nachteile von Hostinger
Nachdem wir uns jetzt Features, Performance und Support im Detail angesehen haben – lass uns einen Schritt zurücktreten und das große Ganze betrachten. Was macht Hostinger interessant … und was könnte dich zögern lassen?
- Hervorragendes Preis-Leistungs-Verhältnis: mehr Speicher, Funktionen und Website-Kapazität als bei den meisten Budget-Hostern – sogar bei den günstigsten Tarifen; du zahlst hier wirklich fürs Hosting, nicht fürs Marketing.
- Globales Datacenter-Netzwerk: 12+ Server-Standorte auf 4 Kontinenten, unterstützt durch erneuerbare Energien
- Bis zu 25 Websites im Einstiegstarif: die meisten Wettbewerber erlauben nur eine.
- Sehr gute Uptime in der Praxis: durchschnittlich 99,98 % über 12 Monate in unseren Tests – deutlich besser als das SLA-Minimum
- Du bekommst eine kostenlose Domain bei der Hosting-Buchung, wenn du mindestens ein 12-Monats-Paket wählst
- Gute Geschwindigkeit: Antwortzeiten selbst bei Shared-Tarifen deutlich unter 700 ms – besonders, wenn optimiert
- Eigenes hPanel: ein modernes, intuitives Bedienpanel, das für die meisten Nutzer sogar besser ist als cPanel
- KI-Funktionen und Website-Builder: Content-Generator, Auto-Layouts, Bildassistent und vollwertiges KI-Prototyping über Horizons
- Schneller und hilfreicher Live-Chat-Support: Antworten in unter 2 Minuten, gute Fachkenntnisse und tausende gut strukturierte Artikel als Fallback
- Risikofreier erster Monat: 30-Tage-Geld-zurück-Garantie auf Hosting-, VPS- und Horizons-Tarife. Lies dir die Rückerstattungsdetails oben durch, um die Ausnahmen zu kennen.
- Kein Telefon- oder E-Mail-Ticket-Support: Hilfe gibt es nur per Live-Chat; manche Nutzer bevorzugen Voice-Calls oder persönlichere Eskalationswege.
- Wöchentliche Backups im günstigsten Tarif: tägliche Backups gibt es erst ab dem
Business-Tarif aufwärts
- Keine Admin-Kontrolle auf Shared-Plänen: wenn du Root-Zugriff, eigene Stacks oder kompletten SSH-Spielraum brauchst – das ist nicht Digital Ocean. Hostinger hält Shared-Hosting bewusst anfängerfreundlich, was manche Profi-Optionen ausschließt.
- Horizons noch in der Entwicklung: Prompt-Limits werden noch angepasst, kein direkter Code-Edit bisher, gelegentliche Monate mit 99,5 % Uptime.
Fazit: Solltest du Hostinger in 2026 nutzen?
Nach über 7 Jahren Testen, Migrieren und Betreiben von Websites auf Hostinger lautet unser Fazit:
Hostinger ist nicht der auffälligste Hosting-Anbieter. Aber es ist einer, der zuverlässig abliefert, stabil läuft und die Preise sehr niedrig hält – ohne an den entscheidenden Stellen zu sparen.
Sie haben eine zuverlässige, moderne Hosting-Plattform mit großzügigen Features, globaler Infrastruktur und einigen wirklich nützlichen Innovationen (hPanel und KI-Tools) aufgebaut – und das alles für unter 5 € bei den meisten Tarifen.
Das ist … selten.
✅ Wer sollte Hostinger ernsthaft in Betracht ziehen?
- Erstmalige Website-Betreiber, die etwas Günstiges und anfängerfreundliches wollen, das einfach funktioniert
- Kleine Unternehmen und Solo-Freelancer, die erschwingliches, skalierbares Hosting mit solider Performance suchen
- Entwickler, Startup-Gründer und Growth Hacker, die Ideen per KI mit Horizons prototypen wollen
- Generell alle mit begrenztem Budget, die trotzdem Hosting auf Premium-Niveau mit modernen Tools, globaler Infrastruktur, freundlichem Support und guter Geschwindigkeit möchten
🚫 Wer sollte sich vielleicht anderswo umsehen?
- Enterprise-Kunden, die telefonischen Support und dedizierte Account-Manager erwarten
- Sysadmins, die fortgeschrittene Features wie eigene Stacks, Root-Zugriff oder Kernel-Tweaks auf Shared Hosting benötigen (versuch Hostingers VPS oder einen spezialisierten Anbieter)
- Geschäftskritische Projekte, die ein SLA von 99,99 %+ und sofortige Eskalationswege brauchen – hier sind Premium-SLAs wie bei Digital Ocean die bessere Wahl
Unterm Strich:
Hostinger bietet dir 80 % von dem, was Premium-Hosts liefern – zum Preis von 20 %. Eine praktische, schnelle und überraschend ausgereifte Wahl für die meisten kommerziellen und privaten Website-Projekte in 2026.
Und falls du Hostinger ausprobieren möchtest, scrolle runter zum Bonus-Bereich, um dir einen zusätzlichen Rabatt zu sichern:
Bonus: Hostinger-Gutschein -10 %
Wir sagen nicht, dass du dich unbedingt für Hostinger entscheiden solltest – aber wenn du es tust, ist es doch schön, noch etwas zusätzlich zu sparen, oder?
Befolge einfach diese Schritte:
-
Besuche die offizielle Hostinger-Website über den Button unten (der Link öffnet sich in einem neuen Tab):
Sichere dir das beste Hostinger-Angebot ›
-
Wähle einen beliebigen Hosting-Plan aus (siehe unsere Anleitung oben) und gehe zur Kasse.
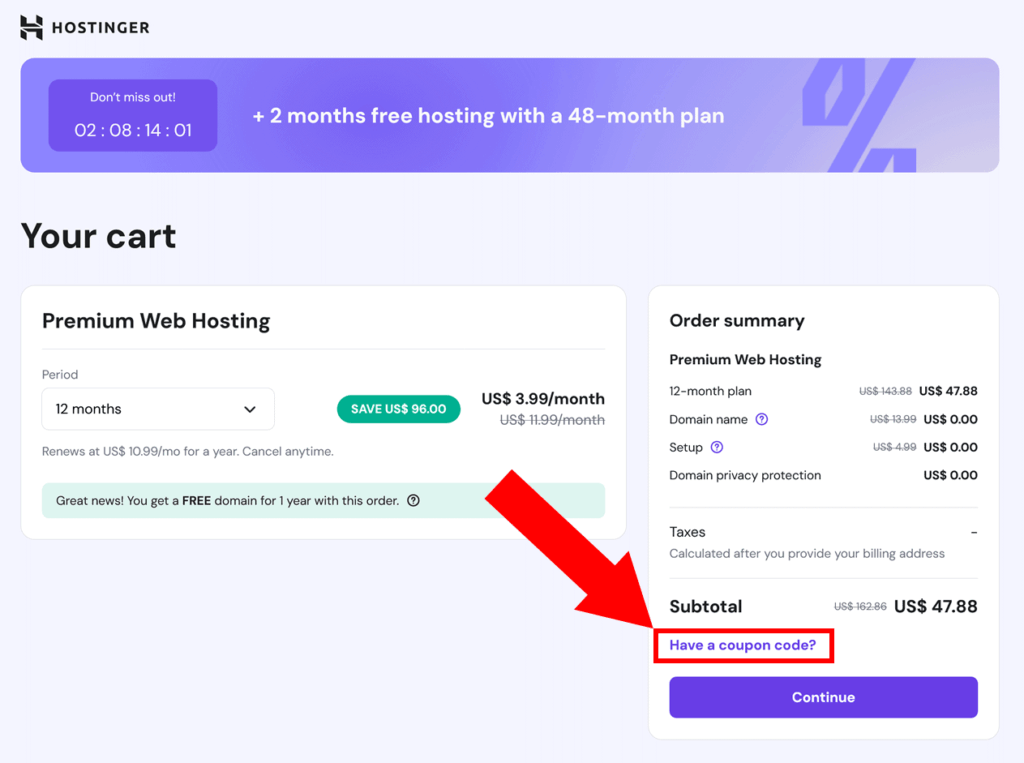
-
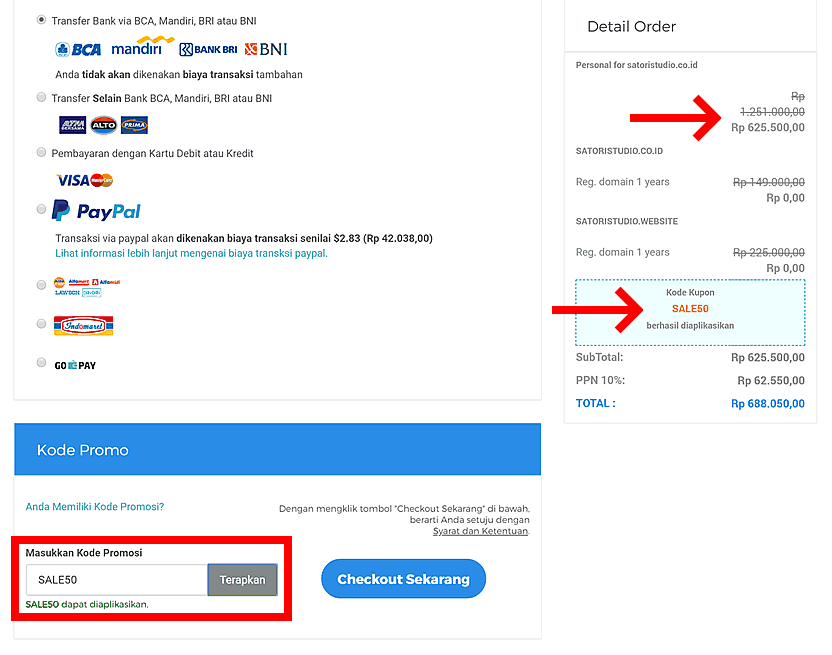
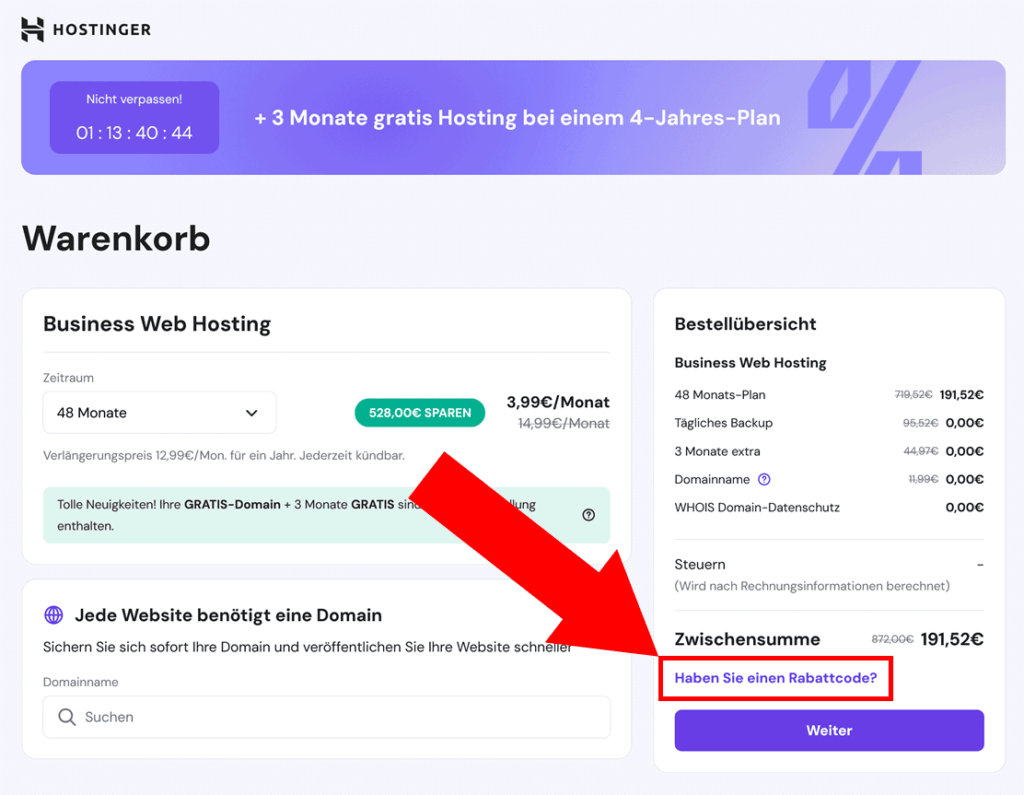
Achte auf der rechten Seite auf den grauen Text „Hast du einen Promo-Code?“. Klicke auf den Link daneben, um das Gutscheinfeld zu öffnen.
-
Füge den untenstehenden Code in das Feld ein:
TRUS10CODE
-
Klicke auf den Button „Anwenden“. Wenn alles geklappt hat, siehst du eine Bestätigungsmeldung und der Rabatt erscheint in deiner Gesamtsumme.
-
Glückwunsch – du hast dir gerade ein noch besseres Hosting-Angebot gesichert. Jetzt kannst du etwas Großartiges bauen!
Falls der oben genannte Promo-Code bei dir nicht funktioniert, schreib es in die Kommentare unten – wir gehen der Sache nach und sorgen dafür, dass du einen funktionierenden Code bekommst.
Häufige Fragen zu Hostinger (FAQ)
Hier ist eine Sammlung der häufigsten Fragen zu Hostinger, die wir in den letzten 7+ Jahren erhalten haben:
Ist Hostinger wirklich kostenlos?
Nein – Hostinger bot früher mal kostenloses Hosting an, aber in 2026 sind alle Pläne kostenpflichtig. Die gute Nachricht: Die Preise gehören nach wie vor zu den niedrigsten der Branche.
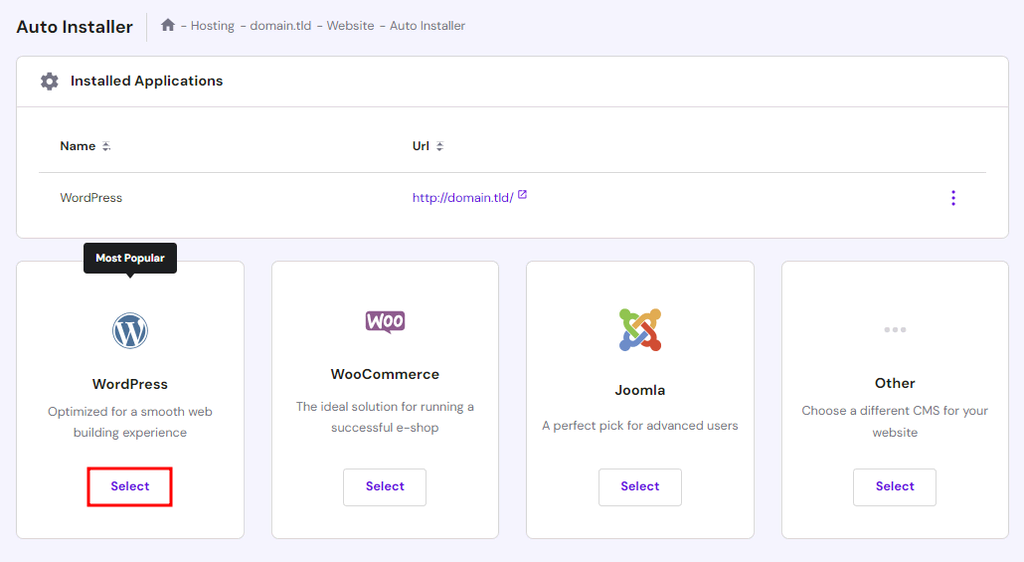
Ist Hostinger gut für WordPress?
Ja. Hostinger bietet 1-Klick-WordPress-Installation, integriertes LiteSpeed-Caching und auf Wunsch KI-gestützte Content-Tools. Geeignet für Einsteiger und Fortgeschrittene gleichermaßen.
Gibt es bei Hostinger Telefonsupport?
Nein – Hostinger bietet keinen Support per Telefon. Die gesamte Unterstützung läuft über den Live-Chat im Dashboard, rund um die Uhr verfügbar.
Ist Hostinger zuverlässig?
Ja – basierend auf eigenen Messungen und Drittanbieter-Tests bietet Hostinger eine Uptime von rund 99,9% mit ordentlichen Antwortzeiten. Nicht der absolut schnellste Anbieter, aber für den Preis sehr solide.
Kann ich meinen Hostinger-Tarif später ändern?
Klar. Sie können jederzeit zwischen Premium, Business oder sogar Cloud/VPS wechseln – ganz einfach im Dashboard. Nicht genutzte Zeit wird dabei automatisch angerechnet.
Gibt es bei Hostinger auch E-Mail-Hosting?
Ja – alle Hosting-Tarife beinhalten kostenloses E-Mail-Hosting. Sie können z. B. Adressen wie ihrname@ihredomain.de erstellen und über Webmail nutzen oder mit Gmail/Outlook verbinden.
Kann ich Hostinger risikofrei ausprobieren?
Ja – es gibt eine 30-Tage-Geld-zurück-Garantie für die meisten Dienste. Wenn Sie unzufrieden sind, können Sie über das Dashboard kündigen und eine Rückerstattung anfordern – ganz ohne peinliche E-Mail-Dialoge.
Hast du noch Fragen zu Servern, Tarifen, Support usw.? Oder nutzt du Hostinger vielleicht schon und möchtest deine Erfahrungen teilen?
👇 Mach mit in der Kommentarsektion unten – so helfen wir uns gegenseitig, fundierte Entscheidungen zu treffen!
Affiliate-Hinweis: Falls dir dieser Testbericht geholfen hat, freuen wir uns, wenn du unseren Blog unterstützt, indem du die Links im Text nutzt, um Hostinger-Dienste zu kaufen. Das beeinflusst nicht den Preis, den du für dein Hostinger-Angebot zahlst, hilft uns aber, weiterhin hochwertige Guides zu erstellen!